Magic Portal
Magic Portal allows you to perform “child component updates/decides what parent component should render” pattern, without breaking the React’s fundermental top-down one-way data flow or triggering double-renders.
When to Use
Sometimes when building complex UIs, you may eventually want to render the “layout” or “container” differently based on some child components.
One of the most notable example would be having a page title component and/or a breadcrumb navigation component inside the global layout’s header, where they actually depend on the current page (which is typically layout’s children) being rendered.
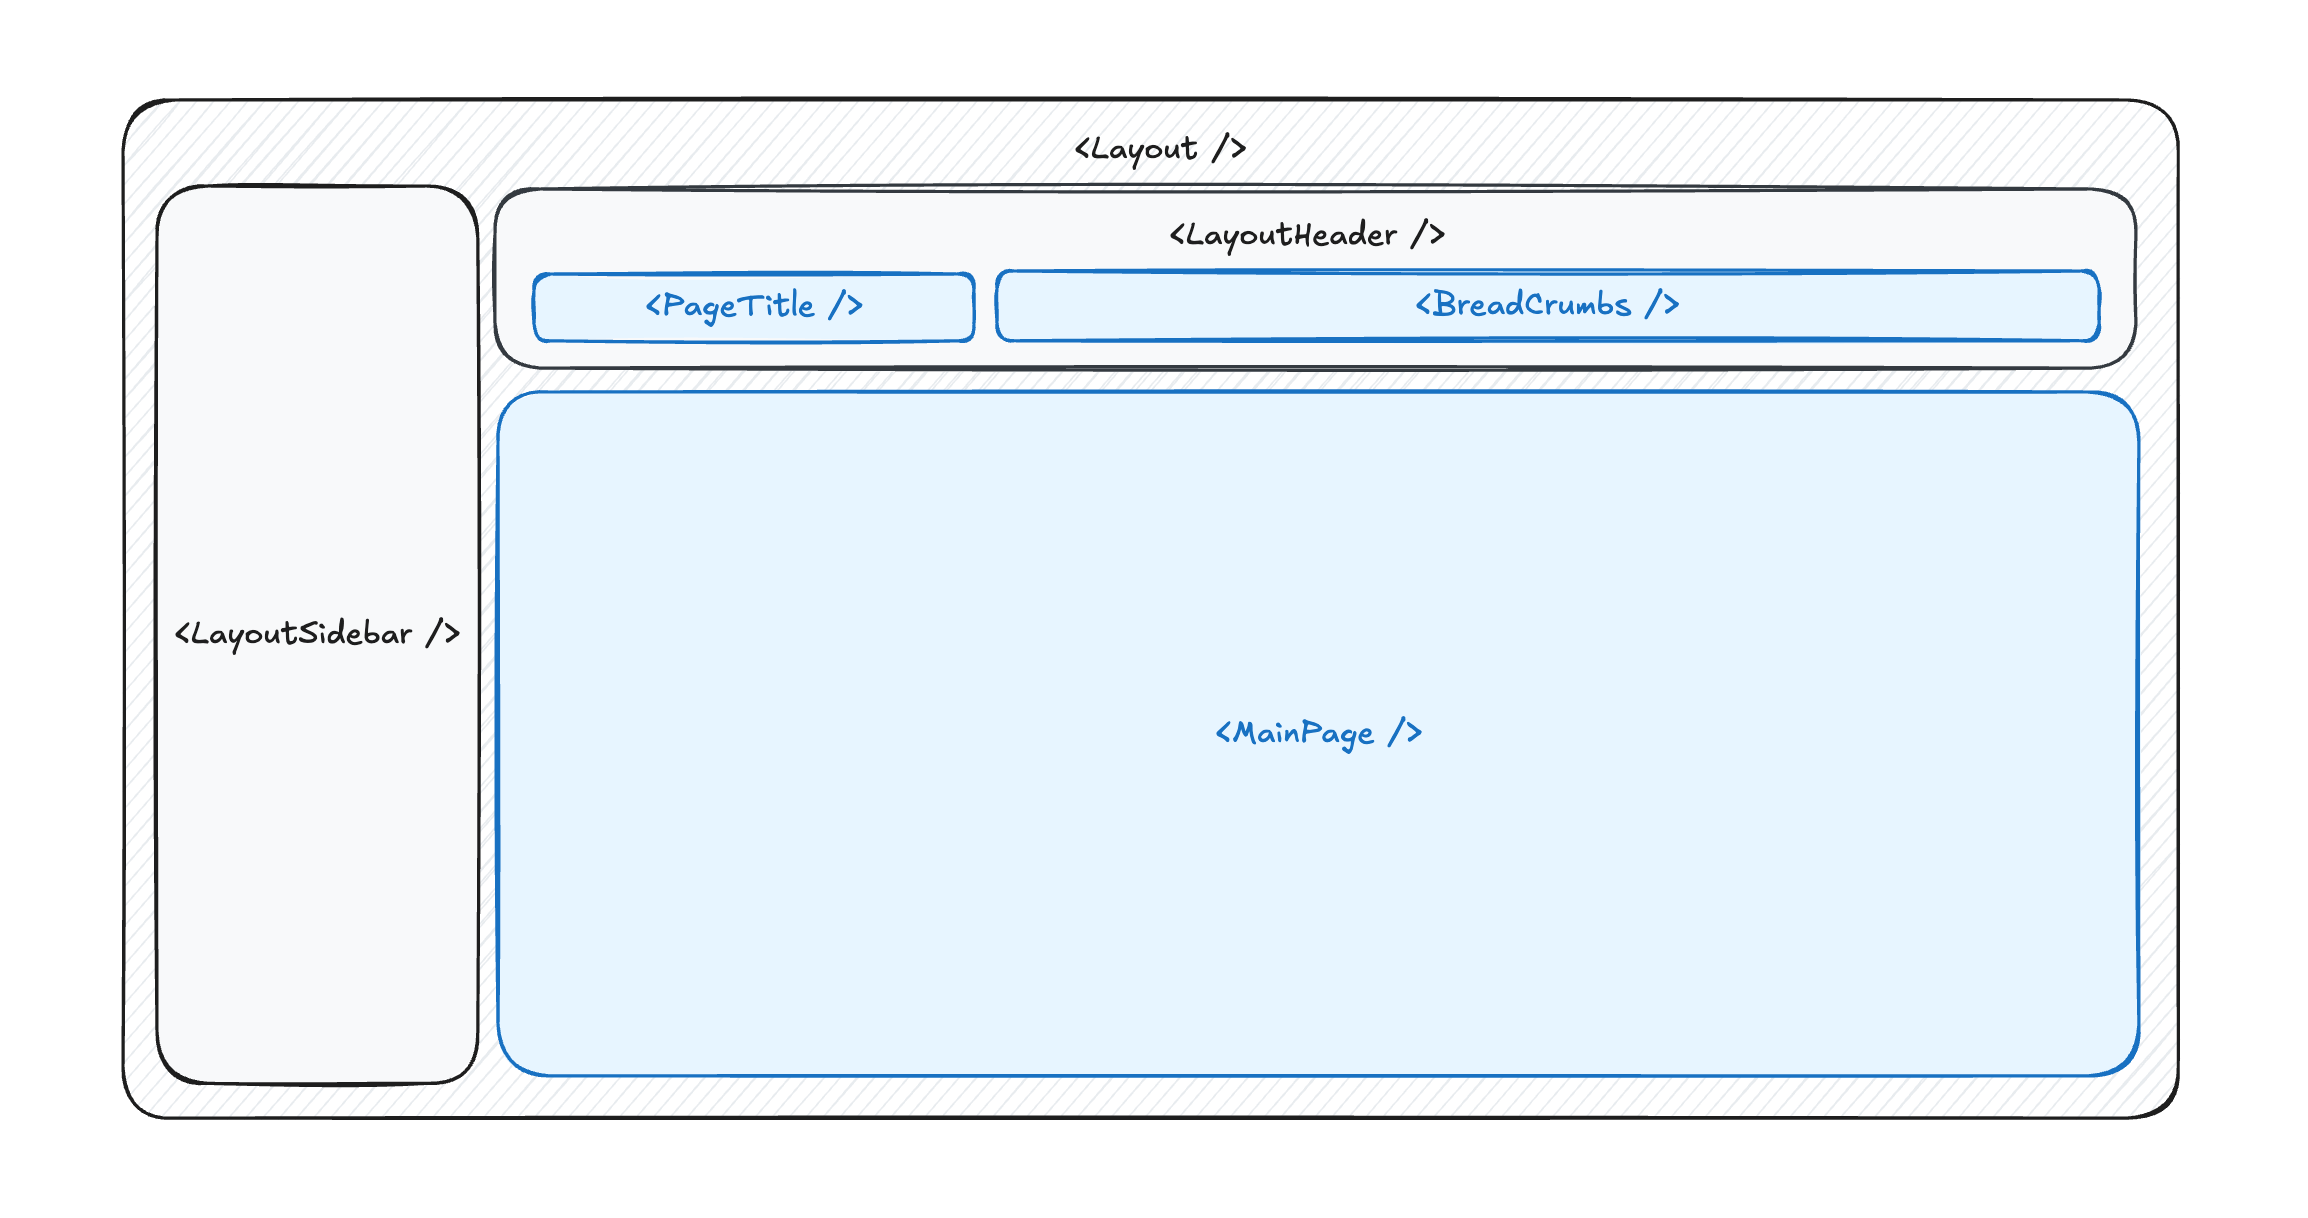
Having your page title component live inside your page component, you achieve better co-location of code, enabling better DX and maintainability. But this can easily result in breaking the React’s fundermental top-down one-way data flow or triggering double-renders.
With Magic Portal, you can achieve this pattern in a simple and clean way, without breaking React’s fundermental principles, without extra renders.
Want to build a breadcrumb navigation with Magic Portal? Check out our Breadcrumbs utility first, maybe it’s what you’re looking for.
Usage
Let’s get started with an example of updating global layout’s header with a dynamic page title from a page component.
First, create a portal provider, portal target, and portal containter with createMagicPortal. It is recommended to place them in a separate file:
'use client';

import { createMagicPortal } from 'foxact/magic-portal';
// createMagicPortal is also available from `foxact/create-magic-portal`:
// import { createMagicPortal } from 'foxact/create-magic-portal';

// By returning an array, `createMagicPortal` allows you to name your components whatever you like:
export const [
  // Holding the necessary states via a React Context
  DashboardLayoutHeaderPortalProvider,
  // Where the portal content will be rendered into
  DashboardLayoutHeaderPortalTarget,
  // The portal content to be rendered in the target
  DashboardLayoutHeaderPortalContent
] = createMagicPortal(
  // An optional name, allows easier debugging in React DevTools
  'DashboardLayoutHeader'
);
You don’t have to wrap your entire app with the portal provider, you can wrap only the part where you want to use the portal, as long as the portal provider is a parent of both the portal target component and the portal content component:
import { DashboardLayoutHeaderPortalTarget, DashboardLayoutHeaderPortalProvider } from '@/portal/dashboard-layout-header-portal';

export default function DashboardLayout({ children }: React.PropsWithChildren) {
  return (
    <div>
      <nav>
        <DashboardSidebar />
      </nav>
      <div>
        {/** you can wrap only the part where you want to use the portal */}
        <DashboardLayoutHeaderPortalProvider>
          <header>
            {/** place portal target where you want to render */}
            <DashboardLayoutHeaderPortalTarget
              // by default the target is an empty div, but you can specify any component you wish via the `as` prop
              as="div"
              // you can pass other props to the target component as well
              // they are type-safe with the `as` props
              className="header-portal-target"
            />

            <SomeOtherHeaderContent />
          </header>
          <main>
            {children}
          </main>
        </DashboardLayoutHeaderPortalProvider>
      </div>
    </div>
  );
}
And now you can declares what to render in the dashboard layout header, by using the portal content component in your page components:
import { DashboardLayoutHeaderPortalContent } from '@/portal/dashboard-layout-header-portal';

export default function ProjectsPage() {
  return (
    <div>
      {/** place portal content anywhere under the provider */}
      <DashboardLayoutHeaderPortalContent>
        <h1>Projects</h1>
      </DashboardLayoutHeaderPortalContent>

      <div>List of projects will go here...</div>
    </div>
  );
}import { DashboardLayoutHeaderPortalContent } from '@/portal/dashboard-layout-header-portal';
export default function SettingsPage() {
return (
<div>
{/** place portal content anywhere under the provider */}
<DashboardLayoutHeaderPortalContent>
<h1>AccountSettings</h1>
</DashboardLayoutHeaderPortalContent>
<div>There goes your account settings...</div>
</div>
);
}By having your page title component live inside your page component, you acheive better co-location of code, enabling better DX and maintainability, while it is still rendered inside the global layout’s header.
Under the Hood
createMagicPortal is built on top of foxact’s createContextState and React DOM’s createPortal API.
<PortalProvider /> holds the dom node (HTMLElement) as a state, where it can be passed to createPortal later.
<PortalTarget /> renders the container element (by default is an empty <div />, but you can specify any component you wish via the as prop) and cature and stores the actual DOM node into the context state via a ref callback.
<PortalContent /> then reads the target DOM node from the context state and passes it to createPortal to render its children into the target DOM node.
Server-Side Rendering
createMagicPortal relies on React DOM’s createPortal API, which doesn’t support server-side rendering (SSR), because there will be no target DOM node to render the portal content into.
Therefore, the <PortalTarget /> component only renders the container element (by default, an empty <div />) on the server, without any portal content being emitted to the server HTML.
You can, however, provide a fallback UI (ideally a skeleton or placeholder) to be rendered during server-side rendering by adding the ssrFallback prop to your <PortalTarget />:
import { PortalProvider, PortalTarget } from '@/portal';

export default function Layout({ children }: React.PropsWithChildren) {
  return (
    <div>
      <nav />
      <div>
        <PortalProvider>
          <header>
            <PortalTarget ssrFallback={<Skeleton_Or_PlaceHolder />}>
          </header>
          <main>
            {children}
          </main>
        </PortalProvider>
      </div>
      <footer />
    </div>
  );
}
With a non-nullish ssrFallback prop, on the server, the fallback UI you provided will be emitted to the server HTML, which provides better UX during the initial load.
After React finishes the hydration in the browser, the actual portal content will be rendered into the portal target as usual and replace the fallback UI.
Under the hood,
ssrFallbackuses foxact’snoSSRutility and the<Suspense />. You can read more about hownoSSR()works, but in a nutshell, it allows portal target to completely opt-out/skip the server-side rendering, and force React to emit the nearest<Suspense />boundary’s fallback UI (i.e. thessrFallbackyou provided) into the server HTML. During the client hydration, React will attempt to render the portal target component again. With the portal target now being rendered on the client, the portal content can be rendered into the target as usual.